


Lauren Bergold shows us how to make a serendipitous Archival Ink background; then turns it into a festive card featuring Wendy Vecchi's MAKE ART products.
Wendy Vecchi Inky Birthday Bash Card by Lauren Bergold
- Materials
- Instructions
Other:
91% isopropyl alcohol
Coordinating colored cardstock in Sunflower Yellow and Vibrant Fuchsia
6" square envelope
Medium-tipped white paint pen
Fine-tipped magenta pen
Markers and/or pencils for coloring the cake (sample uses deep red, medium brown, pale pink, pale yellow, medium orange)
Foam Tape
Doublestick Tape
Optional Machine Stitching
Instructions
Possibly none of us really likes getting older, but most of us LOVE a good Birthday Bash, right? Especially if there's cake!

Step 1: Gather your supplies, including Wendy Vecchi MAKE ART Birthday Bash Stamp, Die and Stencil Set; Wendy Vecchi MAKE ART Bases and Frames Chippies; plus assorted Archival Inks in analogous shades of pink, yellow and orange; rubbing alcohol and white Yupo Cardstock; as well as your favorite coloring media.

Step 2: Working on a Ranger Silicone Mat or other non-absorbent surface, "smoosh" one shade of Wendy Vecchi Archival Ink onto the mat by turning the ink pad upside down and randomly applying a bit of color directly to the work surface. Lightly mist the area with Isopropyl Alcohol (91% is ideal but 70% also works) then place your cardstock face down on the mat and "grab" some of the color. It's best to apply shades individually, to avoid staining your ink pads. To use multiple colors at a time, dispense a few drops from several Archival Reinkers, remembering that the pigment is much more concentrated, so you might need to dilute it a bit more.

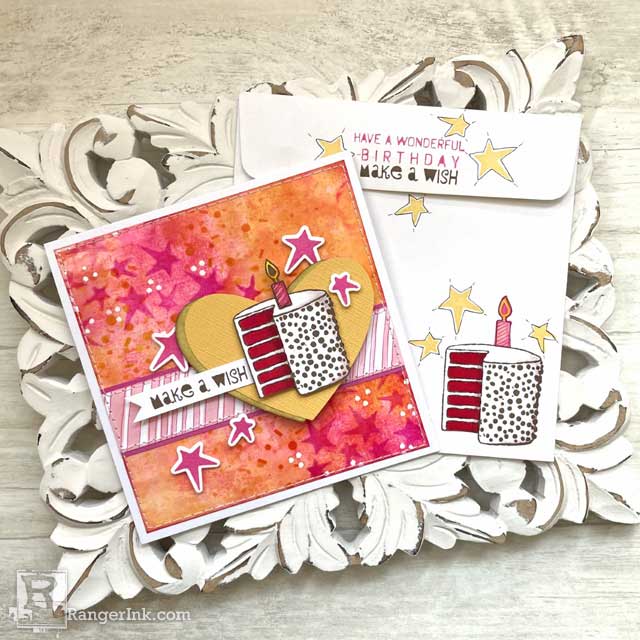
Step 3: Wipe the mat, apply another color, mist with alcohol, and dip your paper into the diluted ink. Change directions with the paper a few times for better coverage. Repeat this step as many times as you'd like, or until the entire paper is covered. This card features shades of yellow (Buttercup and Chrome) and orange (Tea Rose and Bright Tangelo) at the edges, with a patch of pink (Pink Peony and Vibrant Fuchsia) towards the center.

Step 4: Using the two solid stars in Wendy's Birthday Bash set, stamp them randomly, over and over, in Magenta Hue Archival, concentrating on the diagonal area of pink towards the center of the paper.

Step 5: Using the confetti stencil from the Birthday Bash set, apply Sunflower Archival, starting towards the area next to the starry portion of the inky panel and working outwards. Move the stencil several times and change position as needed to achieve a pleasingly abundant arrangement of confetti.

Step 6: Stamp the Cake, Candle and "Make a Wish" sentiment in Potting Soil Archival on scraps of white Wendy Vecchi Perfect Cardstock. Color the cake and candle with markers and/or pencils in a style that represents your favorite type of cake (the sample is Red Velvet, with Cream Cheese Frosting) then diecut or fussy-cut. Stamp the two solid stars multiple times in Vibrant Fuchsia, and use the coordinating dies to cut them out. Mount the images and sentiment on foam adhesive and set aside.

Step 7: On another scrap of Perfect Cardstock, apply Pink Peony Archival Ink through the striped portion of the coordinating stencil from the Birthday Bash set. Add darker stripes with a fine-tipped pink pen, if desired. Trim the strip to 5.5 x 1" and adhere to a skinny mat of Magenta cardstock.

Step 8: Using a Ranger Domed Ink Blending Foam, apply Sunflower Archival to the Heart from Wendy Vecchi's MAKE ART Chippies Bases and Frames set. Trace the heart onto a piece of coordinating Sunflower cardstock and cut out. Adhere the cardstock heart to the Chippie, slightly offset, using Perfect Card Adhesive.

Step 9: Assemble the card: Trim the inky panel to 5" square and ink the edges lightly with Magenta Hue. Add a few scattered dots and doodles with a white paint pen, if desired. Affix the stripey stenciled strip to the inky panel with Perfect Card Adhesive, approximately 1.5" from the bottom of the panel. Add the Chippie Heart to the righthand side of the strip, using double stick tape. Add the cake, candle, sentiment and stars in a cluster. Affix the finished panel to a 5.5" square card and machine stitch around the edges, if desired.

Step 10: Decorate an envelope to match, using the stamps in the Birthday Bash set and coordinating colors. Now you're ready to mail the finished card to your favorite Birthday Girl or Guy!
 My name is Lauren Bergold, I live in central New Jersey with my husband of 30+ years and A LOT of art supplies! My favorite medium is paper and I especially love making cards. I teach papercrafting classes, as well as collecting and compiling vintage and found papers. You can find me on my blog, All the Good Blog Names Were Taken and on Instagram as @llaurenb where I love to connect with other artists and makers!
 Related Posts

Dylusions Pastel Rainbow Notecards by Jess Peters
Soft pastel rainbows, playful splatter, and a handmade touch make these notecards a joy to create and send! 🌈...
Read More
Tim Holtz Distress® Paint Golden Summer Card by Dominique Bennani
This card is proof that simple techniques can create breathtaking results. ✨ Dominique Bennani stamped with Tim Holtz Distress®...
Read More