


Terri Burson shares a fun creative tip for turning flowers into fish using Wendy Vecchi's Stamp, Die & Stencil Sets so you get more use from your supplies.

Wendy Vecchi MAKE ART Fishy Friends Card by Terri Burson
- Materials
- Instructions
Wendy Vecchi Stamp, Die & Stencil Set – Country Flowers, Flower Pot, Let’s Shop, Autumn Greetings
Tim Holtz Distress® Watercolor Cardstock 4.25" x 5.5", 20pc
Wendy Vecchi Perfect Cardstock White Panels 10pk
Wendy Vecchi Blendable Dye Ink Pads: Leaf Green, Orange Blossom, Sunflower, Bluebird, Garden Patina, Fern Green
Simon Hurley create. Stencil 6x6 Nothing But Net
Letter It™ Fineliner Black Pens (3 Pack)
Wendy Vecchi Perfect Cardstock White Cards 80lb (Portrait)
Wendy Vecchi Perfect Card Adhesive, 2oz
Ranger Adhesive Foam Tape White, 2 yards
Tim Holtz Distress® Oxide® Ink Pad Vintage Photo
Ranger Mini Ink Blending Tool
Ranger Mini Ink Blending Tool Domed Replacement Foams
Ranger White Opaque Pen, 2pc
Wendy Vecchi MAKE ART Perfect Stamp Positioner Set
Wendy Vecchi MAKEART Perfect Stamp Block
Wendy Vecchi MAKE ART Stay-tion
Wendy Vecchi MAKE ART Craft Sheet
Ranger Heat It™ Craft Tool
Ranger Archival Ink™: Jet Black
Tim Holtz® Waterbrush Detailer Tip
Other:
Scissors
Masking tape
1.5 inch circle die
Die cutting machine
Instructions
I’m a huge fan of thinking outside the box and today, I’m turning flowers into fish! Whether you’re taking the kids to the lake, hitting the beach or going deep sea fishing, this card can serve as a happy celebration for so many summer events. I hope you’ll stick around for a few minutes as I share the creative details.

Step1: Begin by mounting a Perfect Cardstock White Panel onto your MAKE ART Stay-tion using the Perfect Stamp Positioner and Stamp Block. Stamp one of the solid petals from the Wendy Vecchi MAKE ART Country Flowers stamp set, using Blendable Dye Ink in Orange Blossom, then again with Sunflower. Repeat for each desired image or use other colors of choice.

Step 2: Use masking tape to cover the front half of the fish, then place the sunflower over the fish, lining up one of the petals to form the tail. The center of the sunflower will also be used to add more texture to the fish. It does not matter if your image is masked, as you will fussy cut the stamped images to only include the “fish” (leaf petal) and “tail” (sunflower petal).

Step 3: Once you’ve trimmed your fish, add some embellishment, such as fish scales using a fine point pen, and a White Opague Pen to add tiny white dots for added dimension. Color in the tail with a waterbrush and the same ink, pressed onto a Craft Sheet. Set aside.

Step 4: Using another Perfect White Card Panel, ink multiple images using the foliage image from the Autumn Greetings stencil. Use the Blendable Dye Ink in Fern Green, Leaf Green and Orange Blossom for your “seaweed.”

Step 5: Trim your stenciled images and embellish several with white and black dots using a White Opaque Pen and black fine tip pen. Set aside.
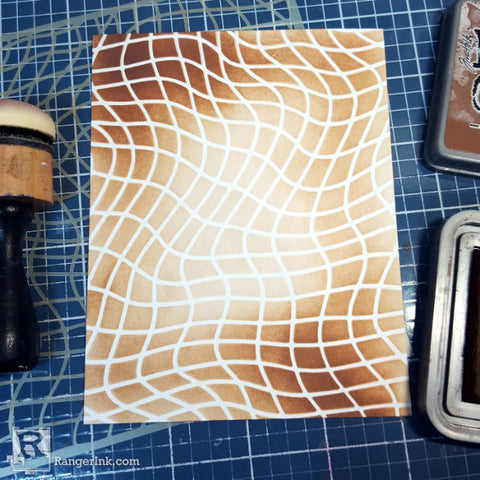
Step 6: Take another piece of Perfect White Cardstock and cover with the Simon Hurley Nothing But Net Stencil. Blend Distress Oxide Ink in Vintage Photo using the Mini Ink Blending Tool and Domed Replacement Applicator Tips. Blend darker on opposite ends and lighter as desired. Set aside.

Step 7: Using a piece of Tim Holtz Distress Watercolor Paper 4.25 x 5.5 inches, spritz with water, then press cardstock into water spritzed ink on your Craft Sheet. Turn paper to make random patterns, one ink at a time using Blendable Dye Ink in Bluebird, Garden Patina and Leaf Green, drying with a Heat It Craft Tool in between each ink color. Trim to a 4 1/8 x 4 1/8 inch panel.

Step 8: Making multiple images, stamp the “weed” image from the Country Flowers stamp set using the Perfect Stamp Block, freehanded, dipping onto the Fern Green Blendable Ink Pad, then directly onto the watercolor panel as shown.

Step 9: Trim a section from one of your used white card panels to stamp the sentiment “Have Fun” from the Let’s Shop stamp set and ink with Ranger Jet Black Archival Ink, along with your Perfect Stamp Block and Positioner. Add an exclamation point using a fine tip black pen. Cut with a 1.5 inch circle die and die cutting machine.

Step 10: Trim a Wendy Vecchi Perfect White Portrait Card down to 4.25 x 4.25 inches and mount the panel with Perfect Cardstock Adhesive. Assemble your images, including trimming a curved section from the stencil trimmed to fit the bottom of your panel. Mount with Ranger Adhesive Foam. Also mount some of the fish with Adhesive Foam, as well as your sentiment. Glue one of the fish flat in your scene, and glue some of the seaweed flat. Glue the bottom edge of 3 of the seaweed and adhere across the top of the stenciled net to finish your card
 Hello, my name is Terri Burson. I’m a native New Yorker, transplanted in the deep South. My husband and I are parents to a 19 year old son and numerous fur babies. I’m an avid card make but love dabbling in many forms of art and mediums. You can find me on most social media platforms @wavingmywand and on my blog at wavingmywand.blogspot.com.
 Related Posts

Simon Hurley create. Ethereal Trees Christmas Card by Cassie Trask
Christmas is almost here! If you’re squeezing in those last handmade cards, let this magical winter scene inspire you....
Read More
Stickles & Embossing Powder Christmas Card by Miriam Prantner
This adorable snowman card by Miriam Prantner is packed with festive charm! Created with the Tim Holtz Sizzix Winston...
Read More