


Follow along as Terri Burson shows you how to create this stunning slimline card using Wendy Vecchi Products and learn some fun techniques in the process.
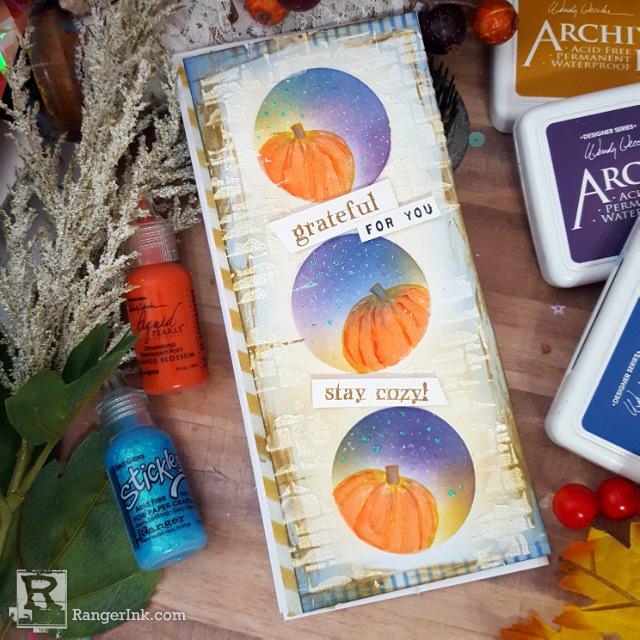
Wendy Vecchi Pumpkin Patch Slimline Card by Terri Burson
- Materials
- Instructions
Wendy Vecchi Stamp, Die & Stencil Set - Autumn Greetings
Wendy Vecchi Stamp, Die & Stencil Set – Country Flowers
Wendy Vecchi Archival Ink ™Pad Goldenrod, Night Sky, Petunia,
Ranger Ink Archival Ink™ Pad: Jet Black
Wendy Vecchi MAKE ART Stay-tion Craft Sheet 9"x9"
Wendy Vecchi MAKE ART Liquid Pearls Orange Blossom
Wendy Vecchi MAKE ART Blendable Dye Ink, Potting Soil
Wendy Vecchi MAKE ART Stay-tion
Wendy Vecchi MAKE ART Perfect Stamp Positioner Set
Ranger Adhesive Foam Tape White, 2 yards
Tim Holtz Distress™ Waterbrush Detailer Tip
Wendy Vecchi Washi Tape Assortment #1
Ranger Heat It ™Craft Tool
Ranger Ink Mini Blending Tool
Ranger Mini Ink Blending Tool Dome Replacement Foams
Tim Holtz Distress™ Ink Pad Brushed Corduroy
Tim Holtz Distress™ Texture Paste: Crackle
Tim Holtz Distress Palette Knife
Simon Hurley Stark White Cardstock
Ranger White Opaque Pen
Other:
Tim Holtz Mini Layering Stencil Set #28
Trimmer
Score Tool
Circle Die
Die Cut Machine
Pencil
Computer paper/Notebook paper
Instructions
Hello. crafty friends. Terri here. Today I’m sharing this colorful Pumpkin Patch Slimline Card that’s full of techniques, along with a mix of new and not so new products that you may already have in your stash. Pull up a chair and let’s get started.

Step 1: To begin, you’ll need two sheets of 8.5 x 11-inch white cardstock. Trim one sheet to 7.5 x 8.5 inches, scoring in half lengthwise at the 3.75-inch mark and set aside. Trim a card panel that measures 3.5 x 8 inches. Use the excess cardstock to trim three 2.5-inch circles with a circle die. Place one circle in the center of your panel and line up the top and bottom circle evenly spaced out. Lightly trace around each circle with a pencil. Discard your circles or save them for another project.
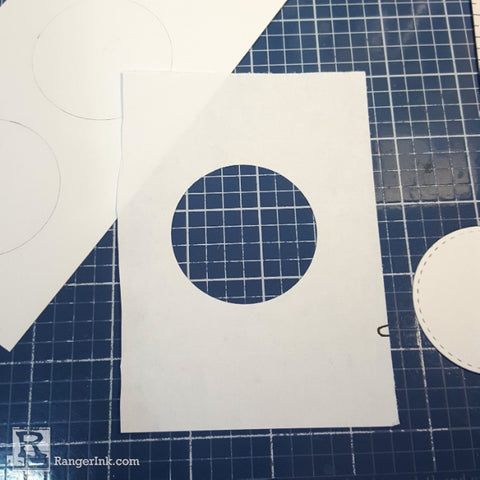
Step 2: Using a piece of computer paper or thin notebook paper, use your circle die to trim out another circle. This will be used to mask the area around your traced circles.

Step 3: Place the mask over the first traced circle on your panel. Using Wendy Vecchi Archival Ink in Goldenrod, stamp with the pumpkin from the Autumn Greetings Stamp Set so that the pumpkin image is partially stamped in the circle with the excess stamping on the mask. Proceed with the next two circles, altering the angles of your pumpkin for each circle.

Step 4: Place your mask back over each circle and ink blend the empty space using Archival ink in Petunia, Night Sky and Goldenrod. Take care not to tear your paper mask. You may need to replace your mask if it gets too heavy with ink, to avoid tearing. If there is slight bleeding of ink in a few places, that can be touched up with a White Opaque Pen.

Step 5: Dab a small amount of Orange Blossom Liquid Pearls to a Craft Sheet. Take your water brush and drop a few droplets of water to paint and dilute some of the color as desired. Paint heavier color along the darker lines of the pumpkin, then blend in lighter color. Try not to oversaturate your paper, to avoid buckling. Dry with the Ranger Heat Craft Tool.

STEP 6: Press some of the MakeArt Potting Soil Blendable Dye Ink onto your Craft Sheet. Using a waterbrush, grab some of the color and paint the stem of the pumpkin and deepen the color below and around the stem.

Step 7: Stencil the top and bottom of the card panel using Night Sky Archival Ink with the MakeArt Country Flowers Stencil and Mini Blending Tool with Domed Applicator Foam, blending all around the panel edges.

Step 8: Take the Tim Holtz Distress Ink in Brushed Corduroy and smear along the sides of the card panel. Next, apply Tim Holtz Distress Crackle Texture Paste using the Distress Palette Knife with one of the stencils from the Tim Holtz mini layering stencil set #28, all around the sides of the panel.

Step 9: Decorate the sky in each circle with tiny white dots from a White Opaque Pen and Sea Glass Stickles Glitter Glue.

Step 10: Line the left side of your card panel with a strip of decorative tape from the Wendy Vecchi Washi Tape Assortment #1.

Step 11: Stamp the sentiments on a scrap of white cardstock using your MakeArt Stay-tion and Perfect Stamp Positioner and Stamping Block, using Ranger Archival Ink and Distress Ink in Brushed Corduroy. Trim your sentiments into strips.

Step 12: Mount your card panel with Ranger adhesive foam tape onto your slimline card to the far right, so the washi tape is peeking out. Mount your sentiment strips with more adhesive foam tape to your card panel.
 Hello, my name is Terri Burson. I’m a native New Yorker, transplanted in the deep South. My husband and I are parents to a 19 year old son and numerous fur babies. I’m an avid card make but love dabbling in many forms of art and mediums. You can find me on most social media platforms @wavingmywand and on my blog at wavingmywand.blogspot.com.
 Related Posts

Make-It™ Dimensional Waves Beach Card by Miriam Prantner
Catch those summer vibes! Miriam Prantner created this fresh and dimensional beach-inspired card using the Make It Wavy...
Read More
Grungy Rainbow Journal Page with Dylusions Ink Sprays by Jess Peters
Bold color, grungy texture, and tons of personality come together in this vibrant journal page by Jess Peters!...
Read More