


Today we welcome Teresa Natividad back for her annual Earth Day project. Follow along as she gives you some clever and cute ideas on how to recycle wine corks using Wendy Vecchi MAKE ART and other Ranger products.

Wendy Vecchi Recycled Wine Corks by Teresa Natividad
- Materials
- Instructions
Other:
Sandpaper
Kitchen Knife
Chopping Board
Paper Clip
Tim Holtz Ideaology Findings
Pin Backs
Magnets
Scissors
Stamping Blocks
Instructions
I have been saving cork from wine bottles. I thought I would turn them into accessories for my Earth Day project this year.

Step1: I had to do some prep first. Cut the cork into different shapes. You can use a regular kitchen knife and chopping board.

Step 2: If they come out a bit rough, you can sand your cut pieces.

Step 3: This is what it looks like sanded vs unsanded.

Step 4: The pieces can also be gessoed.

Step 5: Once your pieces are prepped, you can use a variety of mediums and techniques to create custom accessories.


Step 6: The easiest method I’ve found is to paint on them.


Step 7: Even though some of the surfaces were rough, I still found it easy to stamp on them.

Step 8: For a few of the pieces, I stamped on copy paper and cut and colored the images.

Step 9: I then glued these on.

Step 10: I was even able to color directly on the cork with markers (I suggest gessoing the surface first if you are going to color).

Step 11: I found some common household items and some Tim Holtz Idea-ology to attach to my cork. Here are my finished pieces.
I made this set of magnets by painting with Wendy Vecchi Liquid Pearls in Prickly Pear and Ranger Liquid Pearls in Ivy Green, then stamped with Jet Black Archival Ink. I attached magnets with Glossy Accents.
Step 12: I prepped this piece using Dina Wakley White Gesso first. I stamped on it with Jet Black Archival Ink and colored it with Letter It Colored Fineliner pens. I applied a top layer of Glossy Accents to create a dome. Finally, I attached a tie tack pin to the back.

Step 13: I made another pin with a different pin back. I painted directly onto this with Wendy Vecchi Liquid Pearls in Cornflower Blue, then made dots with the same.

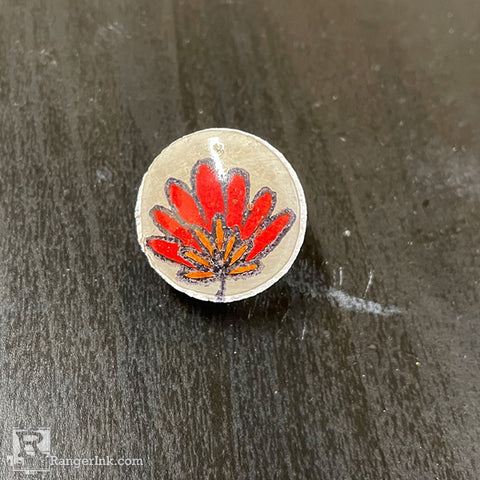
Step 14: I like the shape of this piece. I cut this cork at an angle to make an oval surface. I gessoed it with Dina Wakley White Gesso, then painted with Wendy Vecchi Liquid Pearls in Sunflower. I stenciled the checkered pattern on it with Jet Black Archival Ink over a stencil from Wendy’s Stamp Die Stencil Set - Flower Pot. I stamped an image from the same set in Jet Black Archival, then colored it with Letter It Colored Fineliners, fussy cut it, then adhered it to the piece with Dylusions Creative Dyary Glue Stick. I used Ideaology pieces to make the keychain.


Step 15: I cut a thin piece of cork for this piece. I gessoed it with Dina Wakley White Gesso, then stamped an image from Wendy Vecchi Stamp Die Stencil Set - Flower Pot in Jet Black Archival, and colored it with Letter It Colored Fineliners. I attached a coated paper clip with Glossy Accents to the back.
I hope this gave you some tips on how to use things that would normally be thrown out and turn them into decorative pieces that are unique.
 Teresa works at Ranger by day and at night, dabbles in creative pursuits such as crafting, cooking, and community theatre. Evidence of these can be found at her Instagram handle, @asiattic.
Related Posts

Make-It™ Dimensional Waves Beach Card by Miriam Prantner
Catch those summer vibes! Miriam Prantner created this fresh and dimensional beach-inspired card using the Make It Wavy...
Read More
Grungy Rainbow Journal Page with Dylusions Ink Sprays by Jess Peters
Bold color, grungy texture, and tons of personality come together in this vibrant journal page by Jess Peters!...
Read More