


Few things say, "Happy Birthday" better than flowers and cake! Follow along as Lauren Bergold uses Wendy Vecchi's MAKE ART Birthday Bash and A Million Thanks Stamp, Die and Stencil sets to create this (almost) good-enough-to-eat birthday card.
Wendy Vecchi Time for Cake Card by Lauren Bergold
- Materials
- Instructions
Wendy Vecchi Stamp, Die & Stencil Set - Birthday Bash
Wendy Vecchi Stamp, Die & Stencil Set - A Million Thanks
Wendy Vecchi MAKE ART Chippies Wreaths
Wendy Vecchi Embossing Powder Tree Branch
Embossing Powder Vintage Pearl
Wendy Vecchi Archival Ink™ Pads: Orange Blossom, Peachy Keen, Tea Rose, Leaf Green, Potting Soil, Goldenrod
Wendy Vecchi MAKE ART Stay-tion
Wendy Vecchi MAKE ART Stay-tion Craft Sheet 9x9
Wendy Vecchi MAKE ART Perfect Card Adhesive
Emboss It™ Ink Pad Clear
Ranger Mini Ink Blending Tool
Ranger Mini Ink Blending Tool Domed Replacement Foams
Simon Hurley create. Stark White Cardstock
Letter It™ White Foam Roll Tape
Tim Holtz® Alcohol Ink Cardstock
Ranger Misters
Wendy Vecchi Perfect Cardstock White Panels
Instructions
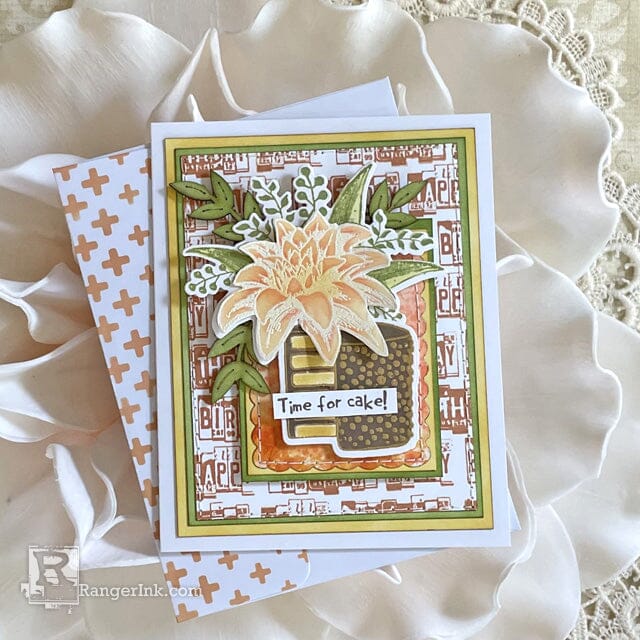
Tiger Lillies and chocolate cake both played a very special part in most of my childhood birthdays. Here's a nostalgic tribute to those days, in card form.

Step 1: Stamp the cake from Wendy Vecchi's MAKE ART Birthday Bash Stamp, Die and Stencil set in Ranger Clear Emboss It Ink on a panel of white Perfect Cardstock and emboss with Tree Branch Embossing Powder. Use the coordinating stencils to color the layers of the cake in Goldenrod Archival and the icing in Potting Soil Archival. Use the coordinating die to cut out the cake and set aside.

Step 2: Stamp the large flower cluster from Wendy Vecchi's MAKE ART A Million Thanks Stamp, Die and Stencil set in Leaf Green Archival Ink on a white Perfect Cardstock panel and use the coordinating stencil to add highlights of Prickly Pear Archival to the leaves. Use the coordinating die to cut it out and set aside.

Step 3: Stamp the same flower cluster with Ranger Clear Emboss It Ink on a white Perfect Cardstock panel and emboss with Vintage Pearl Embossing Powder. Use the coordinating stencil to color the flower in Peachy Keen Archival Ink. Use scissors to neatly cut only the flower out of the design and set aside.

Step 4: Trim a white Perfect Cardstock panel to 3.75 x 5" and create the background by stamping the Happy Birthday license plate sentiment from the Birthday Bash set neatly in horizontal lines, repositioning the stamp each time and allowing the text to go off the edges of the panel. Ink the panel's edges lightly with Potting Soil Archival, if desired. Stamp "Time for Cake" in Potting Soil Archival on a scrap of white Perfect Cardstock and trim into a neat strip.

Step 5: Smoosh some Orange Blossom Archival Ink onto the craft sheet attached to the Wendy Vecchi MAKE ART Stay-tion and spritz with Isopropyl Alcohol from a Ranger Mister. Dip a piece of Tim Holtz Glossy Alcohol Ink Cardstock face down into the ink and lift straight up again. Repeat this step with Peachy Keen and Tea Rose Archival until the panel is covered with various shades of orange, in a mottled pattern. When dry, use the scalloped rectangle die from the Birthday Bash set to cut it out.

Step 6: Trim a piece of white Perfect Cardstock to 4.25 x 5" and a second piece to 2.5 x 3.25" and use a Ranger Mini Ink Blending Tool and a Domed Foam to apply Goldenrod Archival Ink around the edges of both panels. Trim another pair of mats to 4 x 5.25" and 2.75 x 3.5" and use the ink blending tool to apply Leaf Green Archival to the edges of both panels. Lightly ink the edges with Potting Soil Archival, if desired.

Step 7: Use the ink blending tool to apply Leaf Green Archival to the open-ended garland from Wendy Vecchi's MAKE ART Chippies "Wreaths" set. Use scissors to trim the garland into several smaller leafy pieces, so they can be scattered behind the cluster of flowers on the finished card.

Step 8: Assembly: Use Wendy Vecchi Perfect Card Adhesive to affix the small orange scalloped panel to the small yellow mat and then the small green mat. Machine stitch around the edges if desired. Adhere the "Happy Birthday" stamped panel to the larger green mat and then the larger yellow mat; again stitching around the edges if you choose. Use white foam roll adhesive to pop up the diecut birthday cake on the orange scalloped panel. Arrange the flower cluster so it's above and slightly behind the cake, as pictured. Tuck in the Chippie leaf pieces around the edges of the flower cluster and affix them with Perfect Card Adhesive. Add the sentiment strip on top of the cake. Adhere the completed design panel to a 4.75 x 6" card made from Simon Hurley create. Stark White Cardstock.

Step 9: Use the coordinating stencil from the A Million Thanks set to add a decorative pattern to the flap of a white A6 envelope using Peachy Keen Archival Ink. Add a personal message inside the card, address the envelope and mail to a favorite family member or friend who’s having a birthday!
 My name is Lauren Bergold, and I live in central New Jersey with my husband of 30+ years and A LOT of art supplies! My favorite medium is paper, and I especially love making cards. I teach papercrafting classes, as well as collecting and compiling vintage and found papers. You can find me on my blog, All the Good Blog Names Were Taken, and on Instagram as @llaurenb where I love to connect with other artists and makers!
 Related Posts

Dylusions DIY Christmas Gift Wrap & Tags by Jess Peters
Dress up your holiday gifts with this Dylusions DIY Christmas Gift Wrap & Tags by Jess Peters! Using Dylusions...
Read More
Tim Holtz Distress Mini Oxides Christmas Wreath Card by Dominique Bennani
Step into a Winter Wonderland with this charming Christmas wreath card created by Dominique Bennani using the latest...
Read More