


by Miranda van den Bosch

You’ve Got Mail by Miranda van den Bosch
- Materials
- Instructions
- Dylusions Paint : Cherry Pie, Tangerine Dream, Bubblegum Pink, Funky Fuchsia, Crushed Grape
- Dylusions Stencils : Flower Pop, Fresh Dots, Spiderweb, Raindrops, Hearts
- Dylusions Cling Mount Stamps : Puddy Cats, Doodle Flowers, Branching Out, Anatomy of a Page, Foliage, How Does Your Garden Grow, Monster Mash
- Dylusions Paint Pens : Black Marble, White Linen
- Ranger Collage Glue Stick
- Ranger Mini Blending Tool with Foam
- Archival Ink™ #0 Pads : Jet Black
- Dina Wakley Media Gesso : White
- Dina Wakley Media Gel Medium
- Tim Holtz® Distress Watercolor Cardstock
- Tim Holtz by Tonic Studios-Kush Grip and Mini Snips
- Pronty MDF Letter Rack
- Coloured pencils
Instructions

I love getting and sending letters. An email is quick and easy but a handmade card or handwritten letter is more personal; don’t you think so too? The only bad thing is that the cards I receive are lying around everywhere. I don’t have a proper place to store them. So time to make myself a Dylusions style letter rack.

Step 1: I started with adding a thin layer of gesso to the letter rack. The letter rack is made of MDF which is brown. The colours won’t come out so brightly if you don’t add a layer of gesso first. Untreated, the MDF will absorb a lot of the paints also, which is a waste of paints. Pick out some nice Dylusions colours (I’ve used Cherry Pie , Crushed Grape, Tangerine Dream and Bubblegum Pink) and add the paints with a Mini Blending Tool to the surface of your letter rack. Mind that you don’t blend the Tangerine Dream (orange) with the Crushed Grape…you will create mud if you do. I’ve used the red and pink as a border between the orange and the purple, because both the red and pink go well with either the orange or the purple. Choose a few stencils and use the Mini Blending Tool to add some structure to all the sides of the letter rack. Use one stencil with White Linen, white will make the colours pop. Let all the sides dry and assemble the letter rack.

Step 2: Now that the painting is finished, I start with decorating the letter rack. I stamped a lot of the Doodle Blooms with Archival Ink (Jet Black) and recoloured all the black parts of the stamped image using the Dylusions Paint Pen in Black Marble. I hardly ever think that the stamped image is black enough so I normally colour all the black parts again with a paints pen. Glue all the flowers to the letter rack using gel medium (matte). I drew some stems with the Dylusions paint pens Black Marble and White Linen. For the leaves I used the Branching Out stamp set. Cut out the leaves in pairs or singles and glue them on the stems of the flowers. And the letter rack is finished.
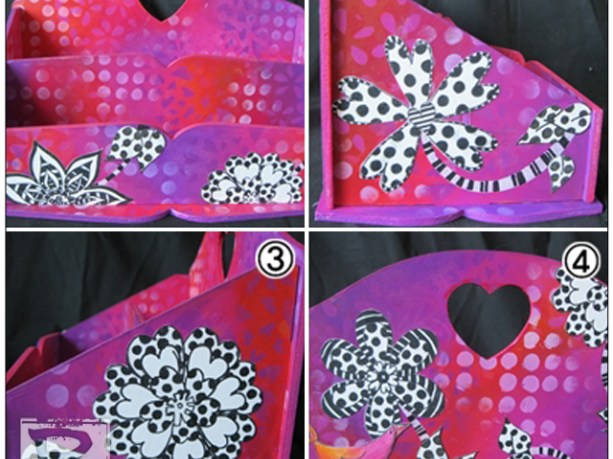
Step 3: Here you see all sides of the letter rack. In the end I decided to add a little birdy and a caterpillar from some older Dylusions stamps sets.

Step 4: For this project I also made a card (a5 size). I have painted the background in exactly the same way as shown in Step 1. I stamped the flowers of the Anatomy of a Page set on my background and on a separate piece of watercolour cardstock. I coloured the flowers on the watercolour cardstock with coloured pencils. Cut out all the flowers and glue them to the stamped ones on the background. This way I don’t have to cut out all the stems and tiny leaves.

Step 5: For the rest of my card I stamped a variety of stamps and just started colouring.

Step 6: For this background I used Tangerine Dream, Bubblegum Pink and Funky Fuchsia. In the end I used one of the Doodle Blooms, a Puddy Cat and at the top I used the new Foliage set.

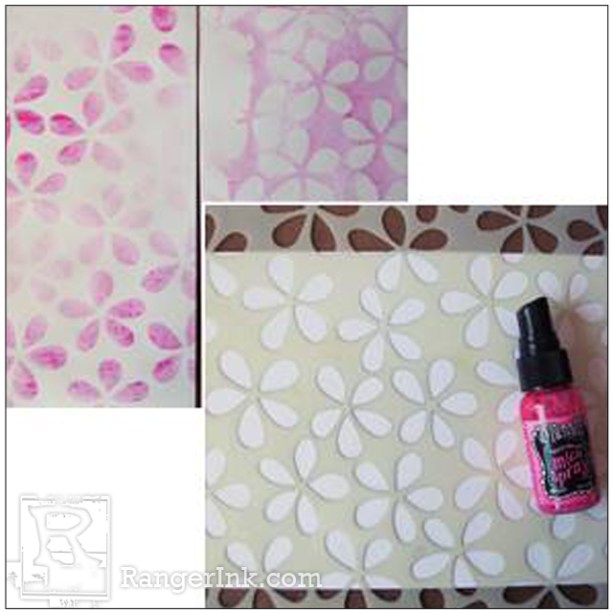
Step 7: I have decorated an envelope, as well. Kept it quite simple just by using a stencil (Flower Pop) and the Bubblegum Pink Dylusions Mica Spray. I might add some doodling later, if I know to whom I will send the card. Make the envelope a bit more personal too.

And this is the letter rack with the card and envelope.

Related Posts

Painting with Liquid Pearls by Miriam Prantner
A little Liquid Pearls magic goes a long way! Miriam Prantner keeps this card simple and stunning by painting...
Read More
"My Cup of Care" Journal Page with Dylusions Pastel Paints by Miranda van den Bosch
Read More
Drawer Title
- Choosing a selection results in a full page refresh.