


Audrey Pettit shares an all-occasion friendship card featuring the Ranger Letter It™ Collection. In this card tutorial, you will learn how to combine stamps and stencils to create a patterned background as well as techniques with Embossing Powders. Creating simple greeting cards for every occasion has never been easier with Letter It™!
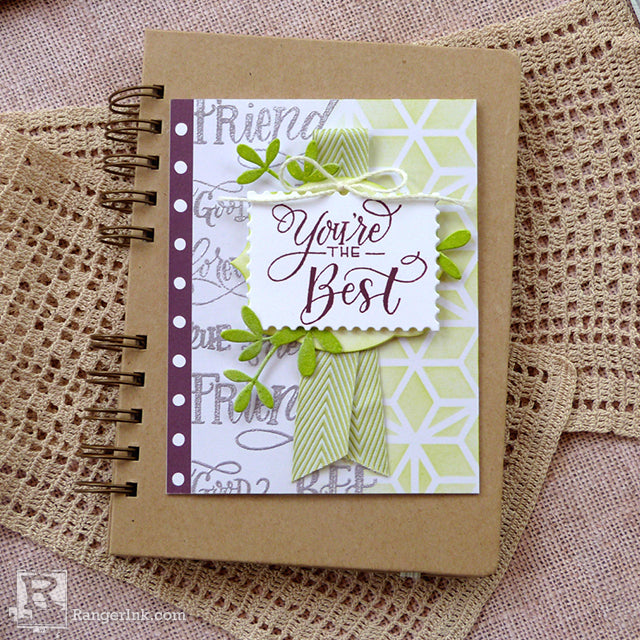
You're the Best Card by Audrey Pettit
- Materials
- Instructions
- Letter It™ A2 White Cardstock
- Letter It™ Stamp Set: Friendship
- Letter It™ Stencil: Puzzled Mosaic
- Letter It™ Embossing Ink: Clear
- Letter It™ Stamping Ink: Plum
- Letter It™ Embossing Powder: Wisteria, Lime Green
- Letter It™ Acrylic Stamp Block
- Wendy Vecchi Perfect Cardstock: White Card Panel
- Tim Holtz® Distress Ink Pad: Twisted Citron
- Ranger Heat It Craft Tool
-
Tim Holtz Distress® Blending Brush
Ranger Anti-Static Pouch
Ranger Multi Medium Matte
Ranger Foam Adhesive: White
Tim Holtz® Alterations Sizzix Dies: Stacked Postage, Labels, Wildflower Stems #2
Patterned Paper: Lawn Fawn
Ribbon, Twine
Instructions
Hi everyone, it’s Audrey, back today with another card project tutorial to share with you. This month, I have an all-occasion friendship card idea featuring lots of fun products from the Ranger Letter It collection.

I love the script-style fonts in the Letter It stamp sets. They are elegant and classic, in a mix of sizes and themes that could be used for any theme or event. And the larger size wording for creating your own background patterned papers and project focal points, too. Not always an easy thing to do with basic sentiment sets.
I’ve got the complete step-by-step instructions to share, so let’s take a closer look.

Step 1: Tape a Letter It A2 white cardstock panel to the back of the Puzzled Mosaic stencil using a bit of washi tape or removable tape. Place the paper down onto a work surface. Starting at the right side of the paper, ink up the stencil with Twisted Citron Distress Ink using a Distress Blending Brush. Apply the ink fairly heavily to the right edge, and fade off the inking towards the center.

Step 2: Make sure the Distress Ink is completely dry. Swipe the cardstock with an Anti-Static Pouch. Arrange a variety of words from the Friendship stamp set onto the Letter It clear acrylic stamping block. Ink the stamps in embossing ink, and then stamp them onto the left side of the cardstock panel. Ink the stamps again, and stamp another time below the first set of images. Continue stamping until the entire left side of the panel is covered. Fill in any blank areas with some of the smaller words, if needed.

Step 3: Coat all the embossed area with Wisteria embossing powder, and then heat set the powder with a Heat Tool. Trim off ¼” from one side of the cardstock panel. Trim a ¼” strip of polka dotted patterned paper. Adhere the patterned paper to the left side of a Perfect Cardstock White Card Base. Adhere the embossed/stenciled panel to the right side of the card base.

Step 4: Stamp the “You’re the Best” sentiment onto another piece of Letter It white cardstock using Plum Archival ink. Die cut the sentiment with one of the smaller shapes from the Stacked Postage die set. Die cut a label shape from the white cardstock that is slightly larger than the sentiment block. Ink the label shape with Twisted Citron Ink. Adhere the sentiment to the label using foam adhesive.

Step 5: Die cut a pair of greenery sprigs from white cardstock. Coat the greens with clear embossing ink and cover them with the Lime Green embossing powder. Heat set the powder.

Step 6: Cut a 10” strip of green chevron ribbon. Fold the ribbon in half, and adhere it to the center of the card base using Multi Medium Matte adhesive. Add the sentiment to the center of the ribbon using more of the Multi Medium Matte. Snip apart the greenery sprigs, and tuck small sections of them around the sentiment label. Tie a bow from white twine, and adhere to the top of the label.


Related Posts

Make-It™ Chic Birthday Mini Card Set by Lauren Bergold
In this tutorial, Lauren Bergold creates an adorable set of four mini cards using the Make-It™ Chic Birthday Stamp...
Read More
Using Dina Wakley Media Scribble Sticks to Make Fun Backgrounds by Laura Dame
Bright color, bold marks, and lots of creative play! In this fun tag tutorial, Laura Dame...
Read More